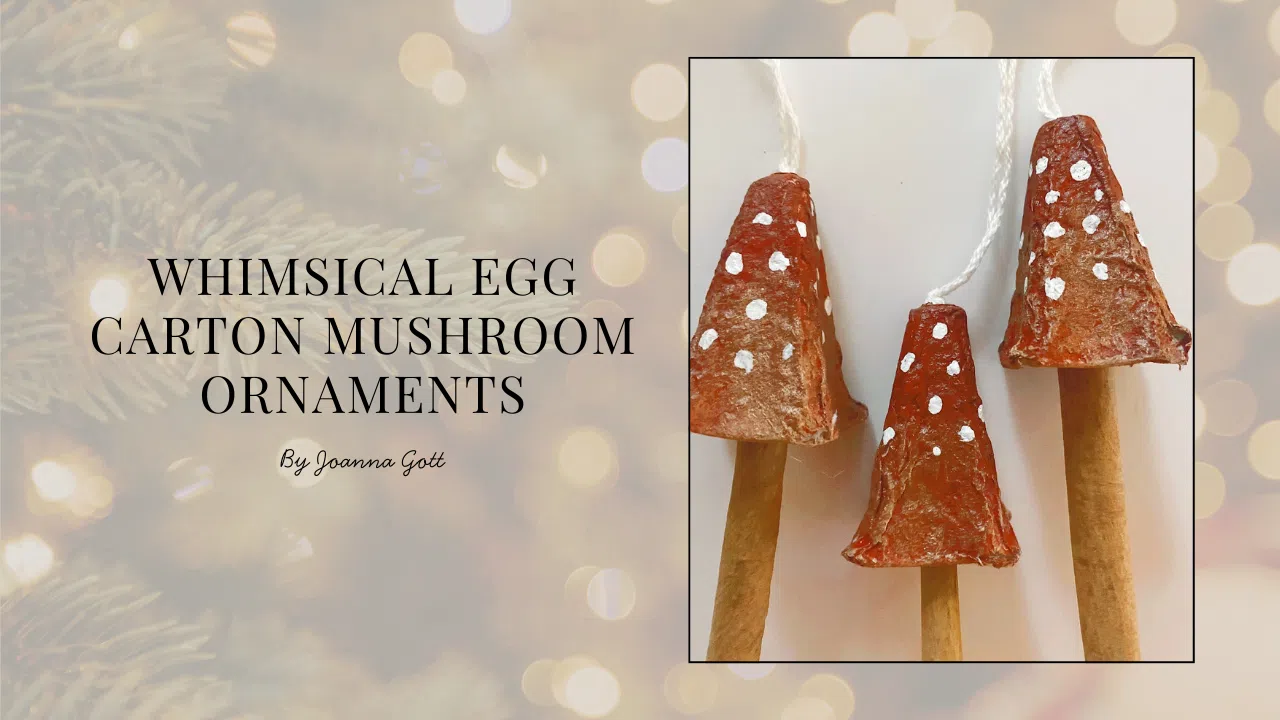
There’s something extra special about handmade ornaments—especially the ones crafted by little hands. They capture a moment in time, a memory you can hang on your tree year after year. If you’re looking for a simple, affordable, and absolutely charming Christmas craft this season, these Whimsical Egg Carton Mushroom Ornaments are just the thing.
They’re adorable, smell amazing (thanks, cinnamon sticks!), and are surprisingly sturdy. Plus, kids love how imaginative and fairy-like they feel. If your holiday décor leans toward woodland, cottagecore, or storybook charm, these mushrooms will fit right in.
So gather your little makers and let’s turn a humble egg carton into something wonderful.
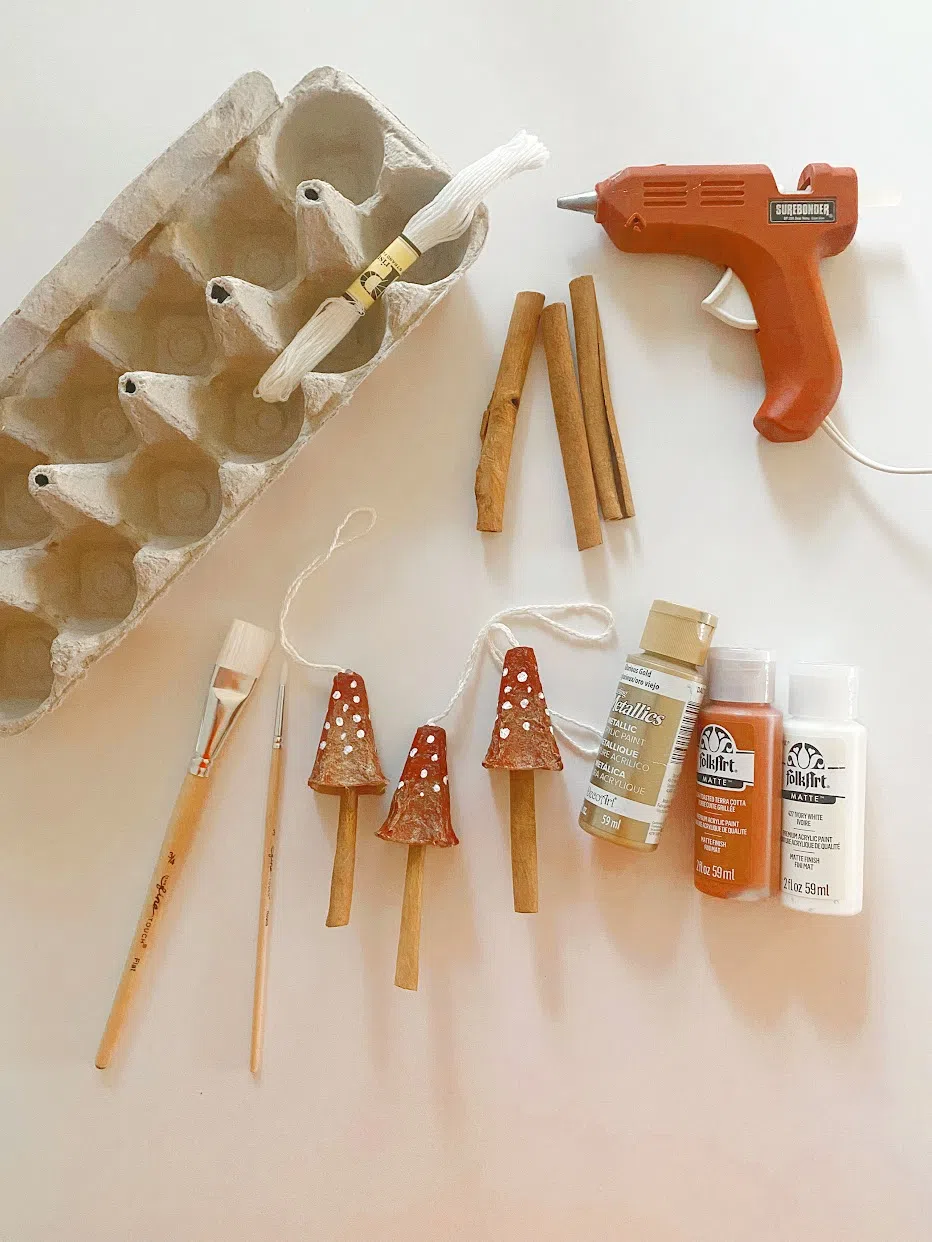
Supplies You’ll Need
Most of these items are inexpensive and may already be in your home. Here’s everything you’ll want to have on hand:
Joanna Gott
Craft Basics
- Egg carton cups (you can use both the middle or rounded sections depending on what mushroom shape you want)
- Cinnamon sticks (these make the stems and smell amazing!)
- Acrylic paint
- Red, white, and any fun accent colors
- Paintbrushes
- A medium brush for base colors
- A small detail brush for polka dots
- Hot glue gun (or strong craft glue for younger children)
- Small eye screws or ornament hooks (optional)
- Twine, ribbon, or string
Optional Embellishments
- Glitter or metallic paint for extra shimmer
- Tiny pom-poms
- Felt leaves
- White paint pen for easy dot-making
Protective Items
- Paper plate or scrap cardboard for painting
- Apron or old shirt for the kids
- Table covering
Step-by-Step Instructions
These mushrooms come together quickly, making them perfect for short attention spans and multi-kid households. Here’s how to make them:
Joanna Gott
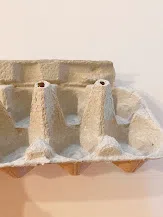
1. Prepare the Mushroom Caps
Cut individual cups from your egg carton. Each cup forms a little dome—perfect for a mushroom cap. We ended up using the middle sections as my daughter Penny liked the look of the longer mushroom, but either size works! Trim any uneven edges until it resembles a smooth, curved shape. Imperfections add charm!
2. Paint the Caps
Let your kids choose their favorite colors. Classic red with white dots is a favorite, but feel free to try:
- Soft pastel pink
- Forest green
- Sky blue
- Metallic gold
After the base coat dries, use a small brush or paint pen to add white polka dots. Let dry completely.
3. Prepare the Cinnamon Stick Stems
Cut cinnamon sticks to about 2–3 inches long.
They’re perfect because they’re sturdy, natural-looking, and smell wonderful.
If you plan to hang them, screw in the ornament hook now before assembly.
4. Attach the Caps to the Stems
Flip each cap upside down. Add a generous dot of hot glue inside the center and press the cinnamon stick into place. Hold briefly until secure.
If using craft glue, allow extra drying time.
5. Add Details and Shimmer
Kids can personalize their mushrooms with:
- Glitter accents
- Tiny leaves
- Pom-poms
- Painted designs or patterns
Every mushroom becomes a unique little creation.
6. Add the String for Hanging
If hooks were added, simply tie twine or ribbon through them.
Without hooks, glue the ends of a small loop of twine to the top of the cap. Hold until secure.
7. Display and Enjoy
Your whimsical mushrooms are ready to hang on the tree, decorate a garland, or brighten a holiday table display. They also make lovely gift toppers or sweet handmade gifts—tie a few together with ribbon and add a tag for teachers, neighbors, or family.

Joanna Gott
Why This Craft Is Wonderful for Kids
This project offers several benefits:
- Fine motor practice
- Creative expression
- Recycling and eco-friendly crafting
- A cozy sensory experience from the cinnamon
- Low cost and easy setup
But most of all, it creates beautiful moments spent together—moments that last far beyond the holiday season.
A Verse to Remind Us of the Joy of Christmas
As you hang your finished ornaments, take a moment to reflect on the true joy we celebrate:
“For unto you is born this day in the city of David a Savior, which is Christ the Lord.” — Luke 2:11 (KJV)
PIN THIS!
 Read more of Joanna’s contributions to AllMomDoes here.